Creating a Node-RED deployment pipeline to IBM Cloud
01 Jun 2018Node-RED has been available in the IBM Cloud catalog since the early days of what was then known as IBM Bluemix. Provided as a boilerplate application, it gives a really quick and easy way to get started with both Node-RED and the wide range of services available in the catalog.
The boilerplate is optimised for ease of use and getting started. Applications running in the Cloud Foundry part of IBM Cloud cannot treat their local file system as persistent storage - any time the application is restarted the file system is wiped back to its original state. This is why the Node-RED boilerplate comes with an instance of the Cloudant database service; giving it somewhere to store its flows.
It also means that any nodes that are installed using the Palette Manager in the editor have to be dynamically reinstalled whenever the application restarts. This is not ideal as it takes longer to restart, exposes the application to random network/npm failures and also risks memory issues as Node-RED tries to reinstall multiple things at once.
The better solution is to enable the Continuous Deployment feature and edit the application’s package.json file to explicitly add any additional modules. That’s also good as it means your application is version controlled and can be easily restored.
Except that isn’t entirely true. The underlying Node-RED application might be version controlled, but the most valuable part, the flows, are still held in Cloudant.
In an ideal world, you’d have all of your application assets under a single source of version control. It should be possible to deploy that application to separate development, test and production environments. It should all fit in with more traditional developer workflows.
This is the first in a series of posts that will show how you can create just such a workflow.
You’ll be able to develop a Node-RED application on a local machine, pushing changes to a GitHub repository and have them deploy automatically to IBM Cloud using Travis CI.
Getting started
Before we begin, you’ll need:
- A GitHub account - it’s free!
- A Travis CI account - sign-up using your GitHub account - it’s free!
- An IBM Cloud account - sign-up for a Lite Account; it’s free, doesn’t require a credit card, never expires and gives you enough resources to get started
You’ll also need Node-RED installed locally.
Create a new Node-RED project
Node-RED introduced the Projects feature in the 0.18 release. It allows you to manage your flows in a git repository along with all the other pieces you need to create a redistributable Node-RED application.
Enabling the Node-RED projects feature
In the 0.18 release, the Projects feature needs to be enabled. Edit your settings.js file and update the editorTheme setting to change the projects.enabled flag to true. If you don’t have an editorTheme setting, add one in:
    editorTheme: {
        projects: {
            enabled: true
        }
    }
You can see how it should look in our default settings file - although the default is set to disable the feature, so if you copy it, make sure you change it to true.
When you restart Node-RED, you’ll be shown a welcome screen that introduces the projects feature.
Create a new GitHub repository
To create our Node-RED project, we’re going to first create a new repository on GitHub for the project.
Login to GitHub, click the New repository option under the + menu in the header.

Give your repository a name and leave all of the options as they are - in particular, do not tick the Initialize this repository with a README option. Then click ‘Create repository’.
On the repository page, copy the git url to your clipboard as we’ll need it in the next step.

Clone the repository into a new project
Back in Node-RED, select the option to create a new project by cloning a repository. When prompted, paste in the git url from the previous step.
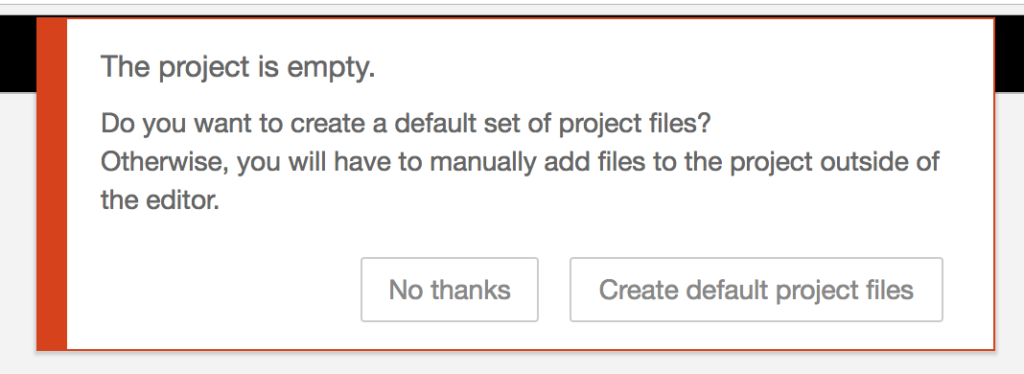
Once you create the project, you’ll get a message saying it’s empty and it will offer to create a default set of project files - an offer you should accept.
It will then prompt you for the name of the flow file to use - we’ll use flow.json. Next it will ask about encrypting your flow credentials - something you must enable as you will be publishing your flow to GitHub. Provide an encryption key and make a note of it for later on.
With that done, you’ll now have your project ready to start wiring up your flows.
Modify the project to run on IBM Cloud
In order to deploy your Node-RED project as a Cloud Foundry application on IBM Cloud we need to add some extra files and update an existing one. These changes need to be made outside of Node-RED in a text editor of your choice.
First we need to find the project files. Node-RED stores them in a directory under the runtime user directory. By default, that will be ~/.node-red/projects/<name-of-project>.
Update package.json
The project already has a default package.json file that needs some updates:
- add
node-redin the dependencies section - this will ensure Node-RED gets installed when the application is deployed. - add a
scriptssection to define astartcommand - this is how IBM Cloud will run the application. We’ll look at this in a bit more detail in a moment. -
add an
enginessection to define what version of Node.js we want to run with. You could leave this out and just get whatever the current Node.js buildpack defaults to, but it is better to be explicit.{ “name”: “node-red-demo-1”, “description”: “A Node-RED Project”, “version”: “0.0.1”, “dependencies”: { “node-red”: “0.18.*” }, “node-red”: { “settings”: { “flowFile”: “flow.json”, “credentialsFile”: “flow_cred.json” } }, “scripts”: { “start”: “node –max-old-space-size=160 ./node_modules/node-red/red.js –userDir . –settings ./settings.js flow.json” }, “engines”: { “node”: “8.x” } }
Lets take a closer look at the start command:
node
    --max-old-space-size=160         (1)
    ./node_modules/node-red/red.js   (2)
    --userDir .                      (3)
    --settings ./settings.js         (4)
    flow.json                        (5)
- As we’re running with a fixed memory limit, this argument is used to tell
nodewhen it should start garbage collecting. - With
node-redlisted as an npm dependency of the project, we know exactly where it will get installed and where thered.jsmain entry point it. - We want Node-RED to use the current directory as its user directory
- Just to be sure, we point at the settings file it should use - something we’ll add in the next step
- Finally we specify the flow file to use.
With the current version of Node-RED, 0.18, you should restart Node-RED after editing this file. - it doesn’t know the file has changed and may overwrite any changes you’ve made if you modify the project within the editor later.
Add a settings file
We need a settings file to configure Node-RED for the IBM Cloud environment. Create a file called settings.js in the project directory and copy in the following:
module.exports = {
    uiPort: process.env.PORT,
    credentialSecret: process.env.NODE_RED_CREDENTIAL_SECRET,
    adminAuth: {
        type: "credentials",
        users: [],
        default: {
            permissions: "read"
        }
    }
}
This tells Node-RED to listen on the port IBM Cloud gives us from the PORT environment variable. It also sets the key used to decrypt the credentials - this time coming from the NODE_RED_CREDENTIAL_SECRET environment variable. That lets us provide the key to the application without having to hardcode it in the version controlled files. We’ll sort that out in a later step of this post.
Finally it configures the editor to be in read-only mode. In a future post we’ll turn off the editor entirely, but leaving it running is useful at this stage to help verify your application is running.
Add a manifest file
The next file we need is the manifest.yml file used to deploy the application. Here’s a minimal file to start with. Make sure you change the name field to something unique for your project - nr-demo is already used and will cause your deploy to fail if you don’t change it.
applications:
- name: nr-demo
  memory: 256MB
  instances: 1
Configure Travis
Next we’re going to get Travis to watch our GitHub repository and trigger a build whenever we push changes to it.
Enable Travis for your repository
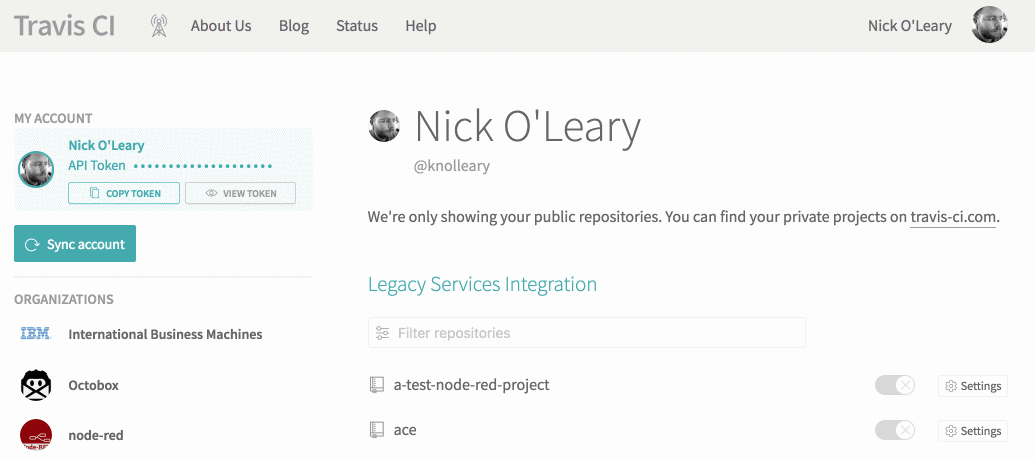
Sign in to Travis and connect it to your GitHub account. Go to your profile page and enable Travis for your new repository. You may have to click the ‘Sync account’ button for it to show up.
Add a .travis.yml file
The project needs a file called .travis.yml to tell Travis what to do when it runs a build. A build consists of three phases: install, script and deploy. For the purposes of this exercise, we’re going to skip the install and script phases - they can be used in the future to run automated tests against the application.
For the deploy phase we can use an integration Travis already has with IBM Cloud - albeit under the old brand name: Bluemix CloudFoundry.
With all that in mind, copy the following into your .travis.yml file:
language: node_js
node_js:
    - "node"
install: true
script: echo "Skipping build"
deploy:
  edge: true
  provider: bluemixcloudfoundry
  username: apikey
  organization: nick_oleary@uk.ibm.com
  space: dev
  manifest: manifest.yml
You’ll need to set the organization and space fields to match your own account details. The username must be set to apikey and the next step is to get a password we can use.
Generate an IBM Cloud API key
We need to generate an API key in our IBM Cloud account which we can use for the Travis deploy.
Log in to the IBM Cloud dashboard and select Manage -> Security -> Platform API Keys from the menu in the header.
Click the Create button, enter a sensible name for the key and click Create. The key will be generated and in the next dialog it will let you copy it to your clipboard. Make sure you copy it - once you close the dialog you will not be able to see it again and you’ll need to generate a new one.
Add the encrypted api key to your .travis.yml
Rather than paste this key into your .travis.yml file directly, Travis provides a way to encrypt the key first so it can be added safely.
To do this, you must first install the Travis CLI. How exactly you do that will depend on your OS and whether you have ruby installed and whether your PATH is setup correctly and lots of other things that may trip you up along the way. Suffice to say, if you have ruby installed, it should be a simple case of running:
gem install travis
You can then run:
travis encrypt --add deploy.password
It will prompt you to paste in your api key, hit enter then ctrl-d. If you look in your .travis.yml file you should see a password/secure section added under the deploy section.
If you get errors such as travis: command not found then you may need to update your PATH to include wherever gem installed the package.
Commit and push changes
At this point, all of the necessary changes have been made to the project files. You can commit the changes and push them up to GitHub. You can do this either via the git command-line, or from within Node-RED.
Committing via the command-line
From within the project directory, ~/.node-red/projects/<name-of-project>, run the commands:
git add package.json .travis.yml manifest.yml settings.js
git commit -m "Update project files"
git push
Committing via Node-RED
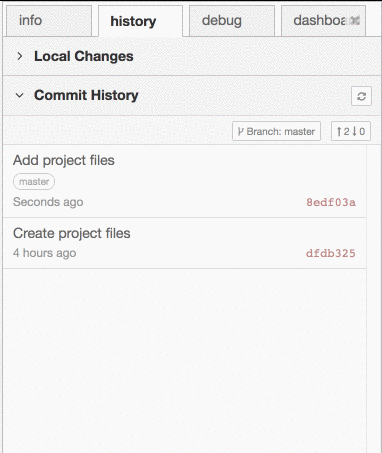
Within Node-RED, open up the history sidebar tab. You should see the four changed files in the ‘Local files’ section. If you don’t, click the refresh button to update the view. When you hover over each file a + button will appear on the right - click that button to move the file down to the ‘Changes to commit’ section.
Once all four are staged, click the ‘commit’ button, enter a commit message and confirm.
Switch to the Commit History section and you should see two commits in the list - the initial Create project files commit and the commit you’ve just done.
Click the remote button - the one with up/down arrows in - and click push in the dialog. This will send the changes up to GitHub.
Watch your build
If you go back to Travis, you should see the commit trigger a new build against your repository. If all is well, two to three minutes later the build should pass and you should be able to open http://<name-of-app>.mybluemix.net and be welcomed by the Node-RED editor.
If it fails, check the build log to see what went wrong.
Tell your application your credential secret
Now that your application has been created on the IBM Cloud, one final step is to tell your application the key it should use to decrypt your credentials file.
Go to the IBM Cloud dashboard page for your newly deployed application. On the ‘runtime’ page, go to the ‘environment variable’ section and add a variable called NODE_RED_CREDENTIAL_SECRET set to whatever credential key you set when you created your Node-RED project right at the start of this whole exercise.
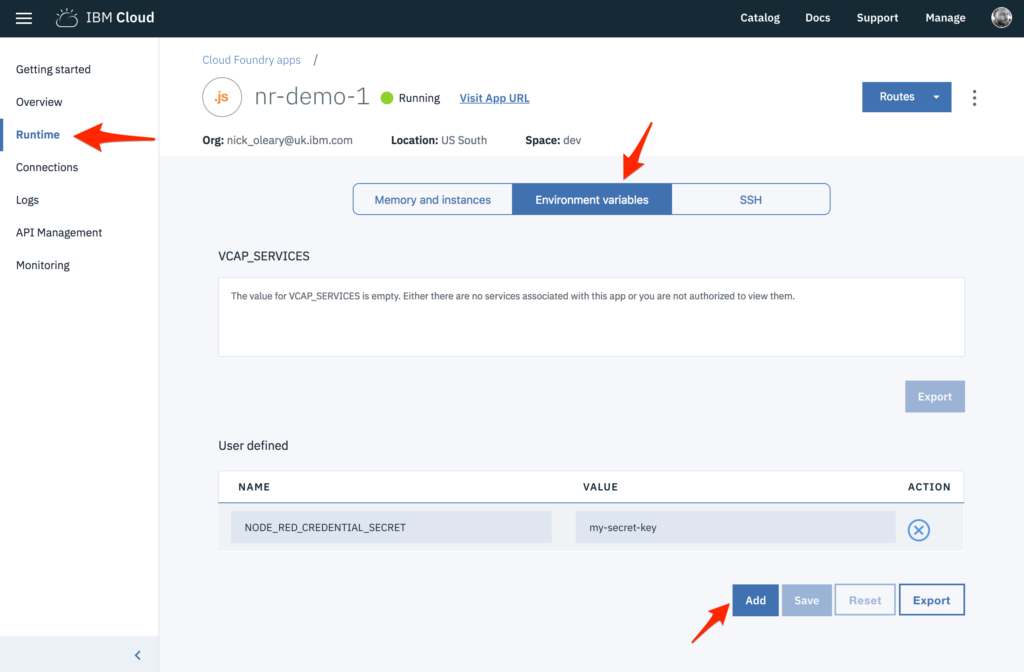
Click the ‘save’ button and your application will be restarted, now with this variable set.
Next steps
If you’ve got this far, well done. You now have a pipeline going from Node-RED on your local machine to Node-RED running in the IBM Cloud. Whenever you make changes locally, commit and push them to GitHub, your application on IBM Cloud will be restaged thanks to Travis.
In the next part of this series, we’ll look at how to start building a simple application using this setup.