Connecting to IBM Cloud services from Node-RED
05 Jun 2018In the first part of this series I showed how to create a deployment pipeline from Node-RED running locally to Node-RED running in IBM Cloud.
It got the basic pieces into place to let you deploy a version controlled Node-RED application to the cloud. The next task is to connect some other IBM Cloud services to the application.
IBM Cloud-aware nodes
The existing Node-RED boilerplate comes with some extra nodes that are IBM Cloud-aware. They are able to automatically detect available instances of their respective services using the VCAP_SERVICES environment variable that Cloud Foundry provides.
One such collection of nodes are for the Cloudant database service, which we’re going to add to our Node-RED application.
The challenge is how to develop against those nodes when running locally - outside of the IBM Cloud environment.
Setting up Cloudant
Create a Cloudant service instance
Open up the IBM Cloud catalog and select the ‘Cloudant NoSQL DB’ service. Create a new instance, making sure you select the same region as your Node-RED application.
Bind Cloudant to your Node-RED application
Go to the dashboard page for your Node-RED application and select the ‘Connections’ tab. Find your newly created Cloudant service in the list and click ‘connect’.
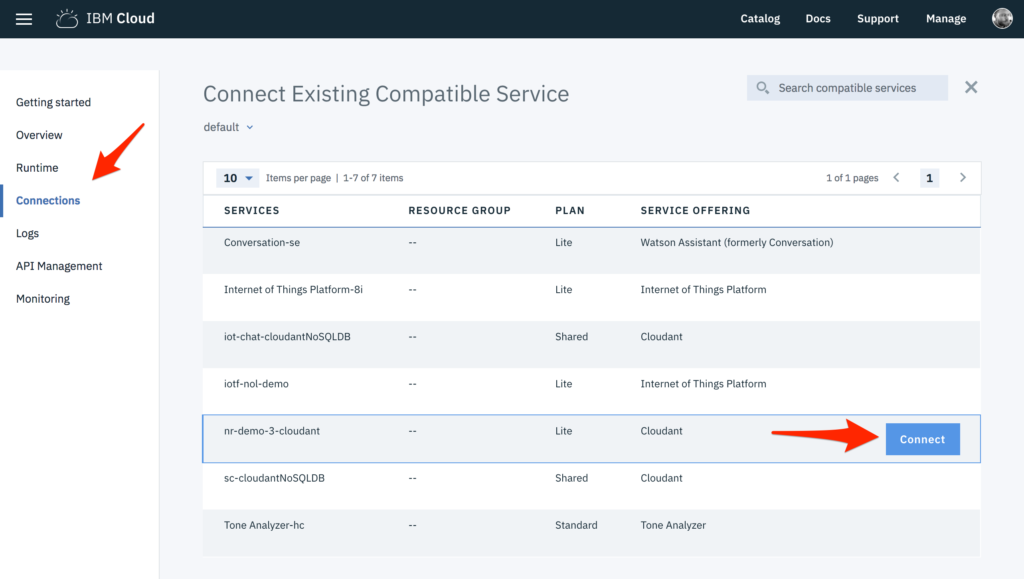
It will prompt you to restage the application which will take a couple of minutes to complete.
Once that’s done, go back to the ‘Runtime’ tab on the IBM Cloud dashboard and the environment variables section. You will see a section for VCAP_SERVICES - this is the environment variable that the platform uses to pass the application all of the details it needs to access the connected services. You should see an entry for our newly created cloudant instance - if you don’t, make sure the restage has completed and reload the page.
Beneath the credentials is an ‘export’ button - clicking that will download a copy to a file called <your-app-name>_vcap.json.
Copy that file into your Node-RED user directory, ~/.node-red - do not put it under version control.
Edit your local settings.js file - this is the one in ~/.node-red not the one in your project directory.
Add the following just above the module.exports line and then restart Node-RED. Make sure to replace <your-app-name>_vcap.json with the actual name of the file you downloaded.
var fs = require("fs");
var path = require("path");

// Load and export IBM Cloud service credentials
process.env.VCAP_SERVICES = fs.readFileSync(path.join(__dirname,"<your-app-name>_vcap.json"));
Your local Node-RED now has access to your service credentials in the same way as your Node-RED in IBM Cloud does.
Install the IBM Cloud-enabled Cloudant nodes
Open up the Palatte Manager from the drop-down menu in Node-RED. Go to the ‘Install’ tab, search for node-red-node-cf-cloudant and click install.
Once installed, you’ll have a new pair of Cloudant nodes in the ‘storage’ section of the palette. Drag one into your workspace and double-click to edit it. The ‘Service’ property should have the name of your Cloudant service listed. If it doesn’t, check you’ve follow the steps to get your VCAP_SERVICES setup correctly.
Close the edit dialog but do not delete the node - we’ll come back to this a bit later.
Add the Cloudant nodes to the project
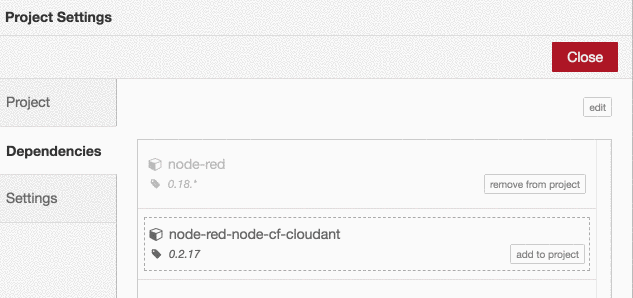
Having installed the nodes locally, we need to add them to our project’s package.json file so they also get installed when deploying to the cloud. We can do this within Node-RED by going to the ‘information’ sidebar tab and clicking the button next to the project name. This opens up the Project Settings dialog.
Go to the ‘Dependencies’ tab where you’ll see a list of the modules our project depends on. This is a combination of modules already listed in package.json and modules which provide nodes we have in our flow. At this point you should have two entries node-red and node-red-node-cf-cloudant.
Ignore the offer to remove node-red from the project as we need that, but do click the ‘add to project’ button next to the Cloudant module.
Commit changes
If you switch back to the ‘history’ tab you should now have two entries in the ‘Local files’ section - manifest.yml and package.json. If you click on either filename it will show you a diff of what has changed in the file. Check the changes look correct then click the ‘+ all’ button to prepare both files for committing and then commit them. Switch to the ‘Commit History’ tab and push the changes up to GitHub.
Wait for the Travis build to redeploy you application and then reload it your browser. You should now have the Cloudant nodes available in the palette and, as before, when you add one to your workspace and edit it, your Cloudant service will be selected.
Separating development and production
At this point, an application built locally will use the same Cloudant instance as the one running in IBM Cloud.
If we consider the local Node-RED as a development environment and the IBM Cloud instance as the production environment, then they really should use separate instances.
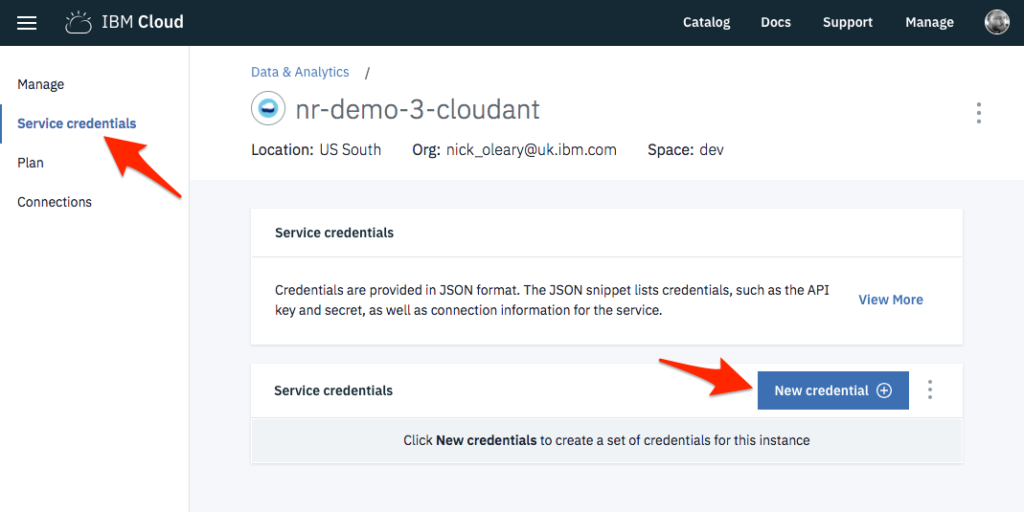
This can be achieved by creating a second Cloudant instance to treat as the development instance. Rather than connect it to your Node-RED application, you can generate a set of credentials from the instance dashboard page.
Update the <your-app-name>_vcap.json file with the new credentials and after restarting Node-RED, your local instance will now be accessing the separate instance.
Next Steps
This post has shown how to connect IBM Cloud services to you Node-RED application with separate development and production instances. It’s another important step to creating production-ready applications with Node-RED in IBM Cloud.
In the next part of this series, we’ll look at how to start building a simple application using this setup. That’s what I said in the previous post, but I really mean it this time.